Sorry about the big delay, have been working so hard we haven't had a minute off to blog! (:D). The project is progressing well (although extremely slowly), and is looking like a few 100 hours work to get to a good stage. We are currently using IRC, MSN and whiteboards to collaborate and keep track of our progress, and we have modulated the code so that it is much easier to transfer and update between computers (see code section).
Room:
-----
The room setup at the moment is going really well, except for some minor hastles. A budget of 100$ was given to building the room (dimensions 2.5 by 2.2 by 2.2). After many designs and many wasted pieces of paper and dead pens, I decided that there was no feasible way to create a freestanding structure of these dimensions which matched the criteria (portible, sturdy, safe and projector reflectivity) without stealing many housing estate signs. I collaborated with a friend who has had many years experience with structual physics and building things, and we decided that the best way to match all criteria in the budget was to create a structure that used the roof for support. The ceiling in the room where we are to present is tiled, and these tiles can be pushed up so that rope can be attached to the steel that holds the tiles in place.
With this decision done, I then began started designing a solution that incorperated the roof. Something light, portable but also sturdy enough to hold the walls in place was needed as a base structure. I decided on electrical conduate as I could aquire some for free and it met this criteria. I built a structure that was 2.2m by 2.2m in size, with an extra 100mm on either side for support to the ceiling. Although I was unsure how I was going to attach the fabric, this was a start and one that was needed as this side of the project was severly draining energy from the team. I used 10$ worth of 1/4 inch by 2 inch bolts to hold the conduate together. Eventually the structure was complete:
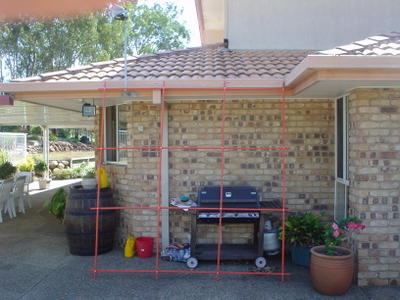

The structure was designed in mind with the roof, and after aquiring some stiff wire, 12 hooks were constructed that would connect the structure to the ceiling.
-------------------- --ceiling
V V V V V V --hooks
--------------- --structure
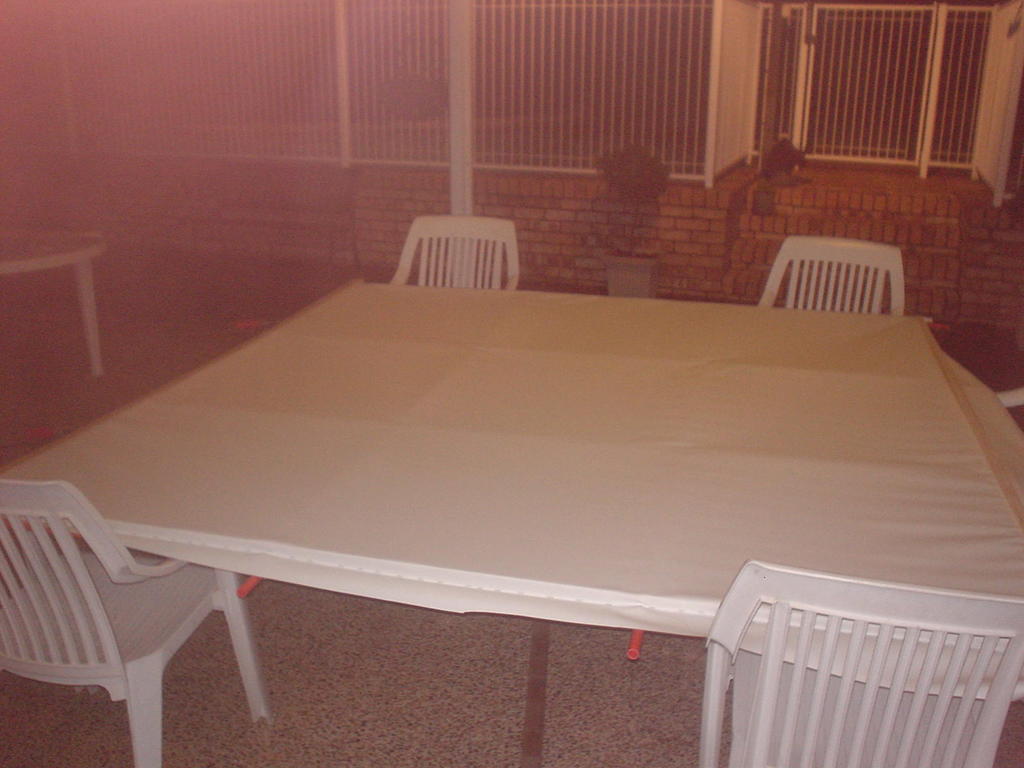
With the structure complete, I then had to choose a fabric that would be sturdy enough to hang from the structure and not twist or gather, as well as a fabric that would have enough reflectivity for the projection. Through a friend I got a bargin on projection material fabric that satisfied both of these requirements. I then designed the cut for the fabric so that 2 walls and the false ceiling would consist of one piece of fabric, and then the front wall would be a seperate piece. This means that the fabric can be transported without creasing it, and it is also the best way to secure it to the structure. The material looks like:

The cost of the material was 90$, which finished off the given budget. I then bought some acrylic cotton that will be used to seam the material so that it bends at the corners properly without curvature. Excess material is also available to block out any light from outside the room, so that the picture is as vivid as possible.
The mirror has arrived, and myself and Erik tested it out (see previous post). I have also begin testing out the projection screen, and I am hopeful that Pauls measurements will be possible to do through the projector alone, rather then the game itself (which will be much more difficult). I have also tried to hook our PC into the sound equipment in the room we are using, but have so far been unsuccessful. I am hopeful that we can aquire a nice digital surround sound setup which can be places outside the 'room', as our game sound and music will be designed with 5.1 surround sound enabled.
Currently I am hoping that the fabric will be completed and attached to the structure by the end of this week (week 11). I then hope to test out the setup with the mirror and Pauls calculations on friday of week 11. Once this is complete, the structure will be pulled down, and only put up again at the end of week 12. Then that leaves 3 days to get the screen setup perfectly and working with the game.
Interface:
---
The interface part of the project has not been progressing very well as of late, but still is the most progressed of all the parts of the project. There are three main parts to the interface, the floor sensors, the 'push' sensor, and the airstick.
At the current time, the airstick has not arrived, although it has apparently been bought. This causes major dramas for our project, as it was anticipated to be the piece of technology that bought the immersion, although if it does not arrive in time for the project it is possible to use a standard mouse. The problem with the standard mouse is that it will make players extremely uncomfortable (as we have found through testing), and will make the effect of the floor sensors lessened.
The floor sensors are almost complete, although there have been some major hastles with them. Firstly due to the age of the EZIO boards that we are using, the time it takes for readings to be taken on the sensors is extremely inefficient. With four sensor readings, there is around 2 seconds of lag, which is not acceptable. However we have discovered that adding multiple EZIO boards will relieve this problem, and so for the final we are hoping to aquire four EZIO boards (at the moment we have two). Another problem is again due to the age of the boards, there is crossover on the connections on the board. This means that when one sensor is pressed, the other sensors also detect a small reading. This means that if a player interacts with the sensors to move forward, then they may also sometimes begin to move left. Again this problem can be removed by using multiple boards. This weekend will also involve creating casings for the analog sensors, so that players have a much larger surface that they can stand on to activate them. This will be done through a foam casing. Once these are complete, the floor pad sensors will be completed. The last stage for this interactive device will be to code into the system 'gestures' where by a player can perform actions such as jumping by performing a set of sensor movements in order. This cannot be completed until four EZIO boards have been acquired (due to the problems with user testing with 2 seconds of lag). The unreal and java code for this has been completed, with the two languages being connected through UDP sockets.
The final part of the interaction is a podium that will contain an analog sensor. This sensor will be used to 'push' things in the virtual world, in particular a stone slab that is situated within the temple. The code for sending this sensors information to the server is complete, however at this time it is unsure whether it will be possible to code. However theoretically it should only require that if the player controller is against an object, then the object will recieve the reading, and will then move accordingly. However due to time constraints this has not been tested yet, as it at a lower priority then the other interactive devices.
Unreal Game and Code:
-----
As stated in the below post, the code for this project has now been modulated so that it is no longer integrated with the UT2004 game itself. We have also created batch files to perform the install of the mod, so that it can be run merely through "UT2004.exe -mod=Unreality". This means that myself and mark can quickly send the game to eachother without having to worry about which files to send. The basic file structure for this mod is:
UT2004 --Root Directory
\-Unreality --Our Modification Directory
\--changelog.txt --A log we have been recording changes to the game
\--compile.bat --A batch file that compiles the source code to unreal and deletes old compilations
\--play.bat --A quick batch file that runs the mod
\--ut2k4mod.ini --An unreal required file that sets the default name, description and URL for the mod
\--Help
\---UnrealityLogo.bmp --Our loading logo for our MOD
\--Maps
\---Palenke.ut2 --The Palenke Map
\---Underworld.ut2 --The up and coming Underworld map
\--Textures
\---Unreality.utx --HUD textures
\---projectunreal_tex.utx --Textures for the maps and static meshes
\--Static Meshes
\---projectunreal_sm.usx --All 3dsmax models for the map are stored
\--Sounds --Where any sounds will be stored
\--Music --Where any music will be stored
\--Karma --Where any physics modifications will be stored
\--Animation --Where additional animations will be stored
\--Unreality --The compiler directory
\---Source --Source code for the MOD
\----avatarPawn --The extention of the player character model and movement
\----avatarXPlayer --The extention of the players controller
\----HUDUnreality --The HUD for unreality
\----myUDP --The socket connection code for the sensors
\----TestModKey --Interaction controls for the menu
\----TestModMainMenu --The main Menu
\----UnrealityCameraMap --Camera emitters
\----UnrealityGame --Constructor class for the game
\----UnrealityMenu_Load --Custom loading menu
\----UnrealityScoreBoard --Inventory and player action recording (an extention of the HUD)
\--System
\---default.ini --Default UT2004 ini file (required)
\---unreality.ini --Custom config file for setting up compile and path locations
\---unreality.int --Construction file used to set game and map type
\---unreality.log --Custom log file
\---unrealityuser.ini --Custom ini file for binding and alias's used in the mod
\---unreality.u --Compiled source code
This structure means that the entire unreality directory can be safely removed and transferred to a clean install of the game without any problems. Although this layout seems quite simple, learning how each part of the mod (especially the ini and int files work) was extremely difficult and tedious.
The main problem we have found with the structure and coding with unreal is that there is simply no official manual. Although there is a brief reference guide, it doesn't cover any specifics on the language. The best sites we have found are: http://3dbuzz.com, http://wiki.beyondunreal.com/wiki and http://udn.epicgames.com/Two/UnrealScript. The last reference is the official reference guide, however most pages within the guide require registration, which costs 250,000$US. Although the entire unrealscript code (which controls all of the game minus the native C engine code) is available for browsing, it is extremely big (about 30 meg of source, which is 6 times bigger then the quake 3 source code). Because of the OO coding style, every class written has to extend a pre-existing class, and then has to be executed by the mod in the right way (either from an int, ini or class file). To use this code effectively, a coder must have indepth knowledge of OO code, including typecasting, polymorphism, extending, interfacing and instancing. The code itself is quite java like, and consists mainly of event handlers, functions and condition statements. An object is the main class, which is extended by actor, which is anything in the game. Anything above that is part of the game, including HUD's, Playercontrollers, AI, sound, anything at all. The problem with this is that the OO structure is destroyed because many things are included where they shouldn't be.
To combat these problems, we have found an incredibly useful IDE code interface for unreal (WOTGreal). This interface is excellent as it sorts the classes in heirarchy which can be look at my better. The IDE also includes syntax highlighting and quick compiling.
Another problem is the fact UnrealEd (the editor for unreal) is extremely buggy and likes to be difficult (currupting, not opening and not saving documents). UnrealEd is required for all placement within a map (actors etc), as well as setting properties, event triggers etc. It is also responsible for creating matinee (cutscenes) and any special effects. It is well integrated with unrealscript, however it is very hostile against Mods. UnrealEd is also required to compile any textures, sounds, static meshes (external 3d models) and animations. Although this program is quite effective at what it does, its problems make the workflow much slower then it should be.
At the moment in the game itself, we have completed the menu screen, loading screens, map (palenke) and are currently working on animations, HUD and the underworld map. We are hoping that we are on track, but there is an immense amount of work left to be done.
Although this is only a brief summary of the work we have accomplished so far, writing an entire list of what we have tried and finished (including code) would take days in itself, although we are hoping to have a FAQ to creating modifications for unreal in the final version. We are still looking at game design ideas, and are hoping that our client can give us a solid and scopable game idea (as he is much more knowledgable in the area of Mayan civilization then we are, although we have some ideas that we are trying out). At the moment we are behind shedual, mainly due to the unexpectedly high learning curve of unrealscript, but we are hoping to accomplish what we first stated, that is a fully living breathing interactive and immersive world that helps to educate users in Mayan civilization.